
If I can’t see skin clearly or keep air moving well, dermaplaning should not start. This checklist comes down to a few daily checks: set the room to 21–24 °C, use LED lighting with a CRI of 90+, keep a task light at about 1,000 lumens or more, clear all vents, check filter status, and make sure clean items, used items, and sharps stay in separate areas with the right facial supplies.
Here’s the short version of what I’d check before the first client:
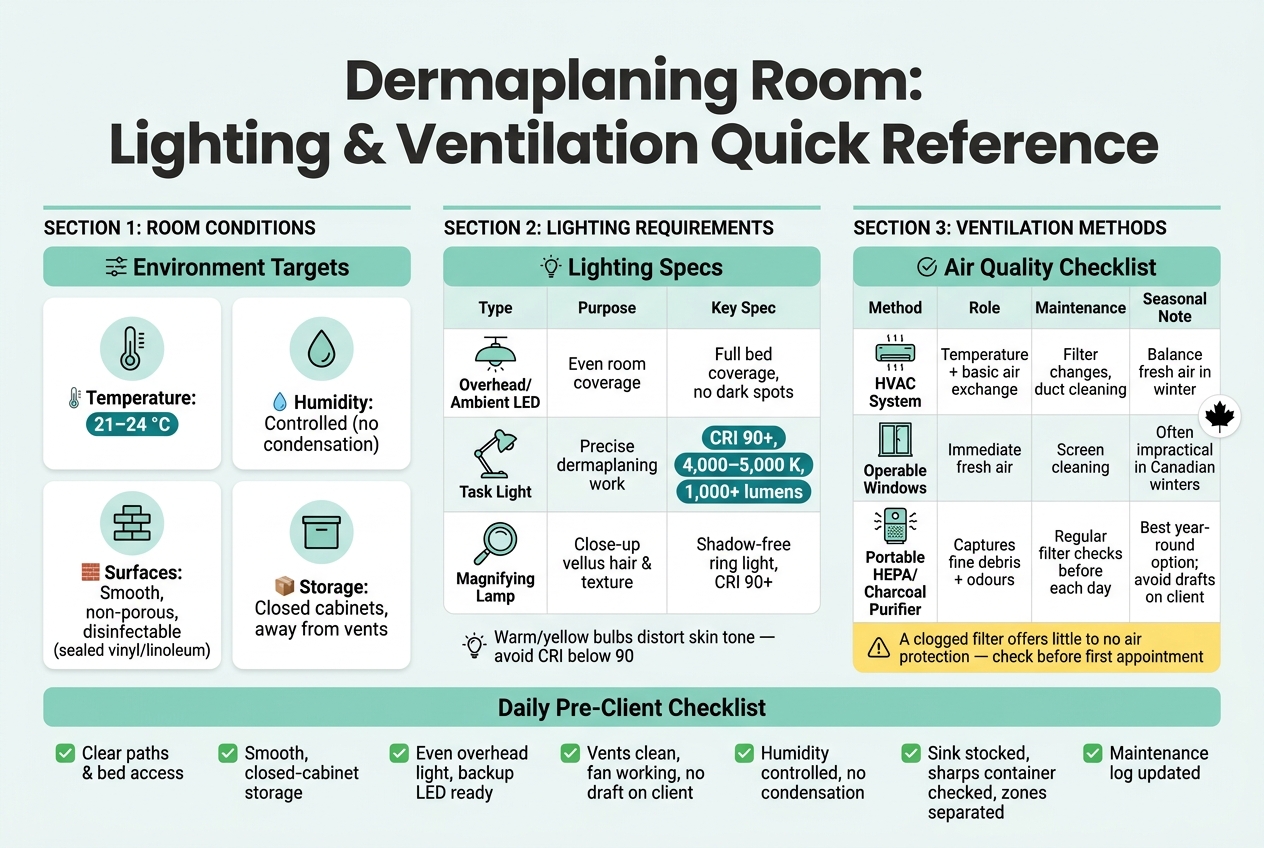
- Room setup: clear paths, bed access from both sides, cords secured
- Surfaces and storage: smooth, non-porous surfaces and closed cabinets
- Lighting: even overhead light, low shadow, correct lamp angle, backup LED ready
- Airflow: vents clean, fan working, no direct draft at the client’s face
- Moisture and comfort: humidity under control, no condensation, room stays comfortable
- Infection control: sink stocked, sharps container checked, clean and dirty zones kept apart
- Maintenance: log lights, vents, and filters on a set schedule
A few numbers matter here. The room should stay at 21–24 °C. Task lighting should be in the 4,000–5,000 K range with CRI 90 or higher. If I use a portable purifier, I’d check the filter before the day starts, because a blocked filter does little for air quality.
This article breaks those checks into a simple room-by-room routine so I can spot problems early and keep the space ready for safe, clean work.
Dermaplaning Room Lighting & Ventilation: Quick Reference Guide
Room Setup Checklist: Layout, Temperature, and Surface Conditions
Start with the layout first. It shapes both your lighting and your airflow.
Treatment Bed Position and Working Clearance
Set up the treatment bed so you can work from both sides without furniture or cords getting in the way. Secure cords or cover them, since they’re a trip hazard when you’re handling a blade.
Keep your trolley at a height that feels easy to work from, stocked with essential dermaplaning supplies, and use an adjustable stool so you can keep a clear sightline without hunching over.
It also helps to split the room into three zones: treatment, clean storage, and used-item disposal. That simple setup keeps contaminated items away from your main work area and makes the workflow feel orderly from beginning to end.
Cleanable Surfaces and Airflow-Friendly Storage
Use smooth, non-porous, disinfectable surfaces for floors, walls, and contact points, such as sealed vinyl or linoleum. These surfaces are easier to clean and fit the needs of a treatment space.
Store clean linens and supplies in closed cabinets. Keep storage away from vents, air returns, and open windows so airflow can move properly and doesn’t blow across your setup.
Target Ranges for Room Temperature and Humidity
Keep the room between 21–24 °C so the client stays comfortable and you can work with steady precision. If the space feels cool, switch on the treatment bed warmer during setup so it’s ready before the client gets on the bed.
When humidity is high, check for condensation on lamp lenses or magnifying loupes. Even a small bit of moisture can get in the way when you need a clear view.
Once the layout and room conditions are steady, move on to lighting and shadow control.
sbb-itb-c911f39
Lighting Checklist for Safe and Precise Dermaplaning
Start with the lighting. You want even coverage, no glare, and a clear view of the skin.
General Room Lighting and Shadow Control
Check that the ceiling lights cover the full treatment bed evenly, with no dark spots over the face or neck.
Use LED overhead lights. They provide steady, bright light.
Once the room light is set, move to task lighting so you can see skin detail at close range.
Task Lighting, Magnification, and Colour Accuracy
Place a dedicated task light or magnifying lamp beside the treatment bed before the service starts.
- Use a lamp with a colour rendering index of 90 or higher and a colour temperature in the 4,000–5,000 K range. This setup shows skin tone more accurately, helps you spot erythema, and makes it easier to tell residual hair from dry skin. A lower CRI or a warm yellow bulb can distort what you see.
- Aim for at least 1,000 lumens for any lamp used during the procedure.
- Magnifying lamps with shadow-free ring lights give you both light and magnification, which helps you catch nearly invisible hairs without straining your eyes.
Client Comfort, Backup Lighting, and Label Readability
Angle the task light so you can see the treatment area clearly without shining it into the client's eyes.
Check blade packaging, disinfectant labels, lot numbers, and expiry dates under the same treatment lighting. If you can't read them there, that's a red flag.
Keep a charged backup LED in the room so you can work safely during a power interruption.
Here’s a quick reference for the main lighting options:
- Overhead/ambient lighting - broad, even coverage for room visibility and client comfort, but not enough on its own for skin analysis
- Task lighting - adjustable, high-CRI light for precise dermaplaning work
- Magnifying lamp - close-up viewing of vellus hair and skin texture; shadow-free ring lights help reduce eye strain
With lighting confirmed, move to airflow and air quality.
Ventilation and Air Quality Checklist for Daily Use
Dermaplaning creates fine debris, so the room's airflow needs to support both hygiene and clear visibility. In Canada, personal service work areas must be adequately ventilated, so this isn't just a nice extra. It's a basic room check. Start with vent placement, then move to purification, moisture control, and protective gloves.
Fresh Air Supply, Vents, and Clear Circulation Paths
Before your first client arrives, check that supply vents, return vents, and grilles are clean and free from blockage. Furniture, storage bins, and folded linens can get in the way more easily than you'd think. Also make sure the room fan is working and set up to move air through the space without blowing toward the treatment area or the client's face.
Closed storage helps on two fronts: it keeps vents and walkways open, and it supports clear circulation paths around the room. Once that's done, move on to filtration and moisture.
Air Purification, Odour Control, and Moisture Checks
A portable HEPA purifier with activated charcoal can help cut down fine debris and odours. That's useful because standard HVAC systems are built mainly for temperature control, not for catching contaminants right where they're created. A portable unit can help cover that gap. Set it up so it doesn't create a direct draft on the client.
A clogged or saturated filter won't do much for the room. Check it before the first appointment, since a blocked filter offers little to no protection. Then take a quick look around the room. Condensation on windows or damp patches on walls usually point to poor air exchange, and that can lead to mould growth.
Seasonal Adjustments for Canadian Treatment Rooms
Winter can make air exchange harder in Canadian treatment rooms. When windows stay sealed to hold in heat, a portable HEPA purifier becomes even more useful during colder months. If fresh air intake makes the space feel chilly, use a bed warmer to keep the client comfortable instead of cutting back ventilation.
| Ventilation Method | Air-Quality Role | Maintenance Needs | Canadian Seasonal Considerations |
|---|---|---|---|
| HVAC System | Primary temperature control and basic air exchange | Filter changes and periodic duct cleaning | Must balance fresh air intake in winter without overcooling the room |
| Operable Windows | Immediate fresh air supply | Screen cleaning; hardware lubrication | Often impractical in winter due to heat loss; may introduce allergens or humidity in summer |
| Portable HEPA/Charcoal Purifier | Captures fine skin debris; adsorbs chemical odours | Regular filter replacement based on usage and saturation | Can be used year-round; position away from the client to avoid cold drafts in winter |
Finish by logging filter status, vent cleanliness, and any airflow issues before the first client.
Maintenance, Infection Prevention, and Supply Checks
Once you've confirmed airflow, use the same room light to check cleaning points, sharps, and supplies.
Lighting for Cleaning, Sharps Disposal, and Aseptic Workflow
Use task lighting to spot residue, debris, and moisture on work surfaces. During daily checks, use that light to inspect your sharps container. Check the fill level and make sure the container is intact and sealed the right way. Use a puncture-resistant sharps container for used blades and sharp instruments.
Make sure your room fan or ventilation system isn't blowing across clean instruments. Closed cabinetry for clean linens and sterile supplies helps protect them from airborne contaminants.
Keep clean, treatment, and dirty zones separate during cleanup and setup. That simple habit helps keep your workflow orderly and lowers the chance of cross-contamination.
Routine Maintenance Log for Lights, Vents, and Filters
A maintenance log helps you catch flickering lights and dusty vents before they affect service. Dust on magnifying lamp lenses can reduce output and throw off colour accuracy, so regular wipe-downs matter.
Log only the items that affect daily visibility, airflow, and safe disposal.
| Item | Frequency | Responsible Staff | Date Completed |
|---|---|---|---|
| Task Light / Mag Lamp (wipe lens, check for flicker) | Weekly | Esthetician | |
| Vent Grilles / Intake Covers (dust and debris removal) | Weekly | Facility Lead | |
| Air Purifier / HVAC Filters (inspect or replace per manufacturer instructions) | Monthly / As Needed | Facility Lead | |
| Sharps Container (fill level and integrity check) | Daily | Esthetician |
Log the date and staff member for each item. Also check non-porous work surfaces monthly for cracks or damage. Maintaining a disinfection and maintenance log is a standard expectation for professional treatment rooms.
Supplies and Training
Use a short supply check before the first client so you're not scrambling mid-service. Confirm that blades, starter kits, and training materials are in stock and easy to access.
Dermaplaning Supplies Canada supports Canadian skincare professionals with professional dermaplaning supplies. Use their wholesale supplies to stock blades, starter kits, and training materials.
FAQs
Why is CRI 90+ important?
A CRI of 90+ matters because it lets you see skin more clearly and with fewer colour shifts. Since it comes close to natural daylight, it helps you spot erythema, hyperpigmentation, dehydration, and skin texture more accurately instead of relying on lighting that can throw things off.
That means less guesswork during close-up work and less eye strain over time. It also makes skin analysis, treatments, and product recommendations feel more sure and better grounded in what you’re actually seeing.
Do I need a HEPA air purifier?
Yes. A HEPA air purifier helps keep a dermaplaning room clean and professional by pulling in fine dust, skin debris, and other biological matter.
It also makes sense to choose a unit with activated charcoal. That added layer helps adsorb chemical vapours and odours released during treatments and cleaning.
How often should I check vents and filters?
Inspect mechanical ventilation systems at least every six months to make sure they’re clean, intact, and working as they should. A qualified person should handle these inspections, and a report should be given to your employer and, where applicable, your health and safety representative.
You should also follow a regular preventive maintenance program so air filters stay clean and keep working properly.