

A chemical peel course in Canada should teach one thing first: how to do peels safely, step by step. I’d expect it to cover client intake, contraindications, Fitzpatrick skin typing, skin prep, peel choice, zone-by-zone application, neutralising, aftercare, and charting.
Here’s the short version:
- I start with medical history, skin history, and client goals
- I check for contraindications like infection, open wounds, herpes simplex history, and recent isotretinoin use
- I use Fitzpatrick skin type to gauge pigment risk, especially for types III to VI
- I plan pre-peel prep, including stopping irritating products and limiting sun exposure
- I choose the peel based on the skin issue, such as acne, pigment, texture, or lines
- I apply the peel one layer at a time, watch for erythema or frosting, and neutralise if needed
- I finish with aftercare, SPF, and chart notes
A few points stand out. Clients who used isotretinoin often need to wait 6 to 12 months before a peel. Pre-peel priming may start 2 to 4 weeks ahead. And for darker skin tones, pigment changes are a bigger risk, so peel depth and product choice need extra care.
If I were choosing a training course, I’d look for one that keeps the process plain, safe, and easy to follow in daily practice.
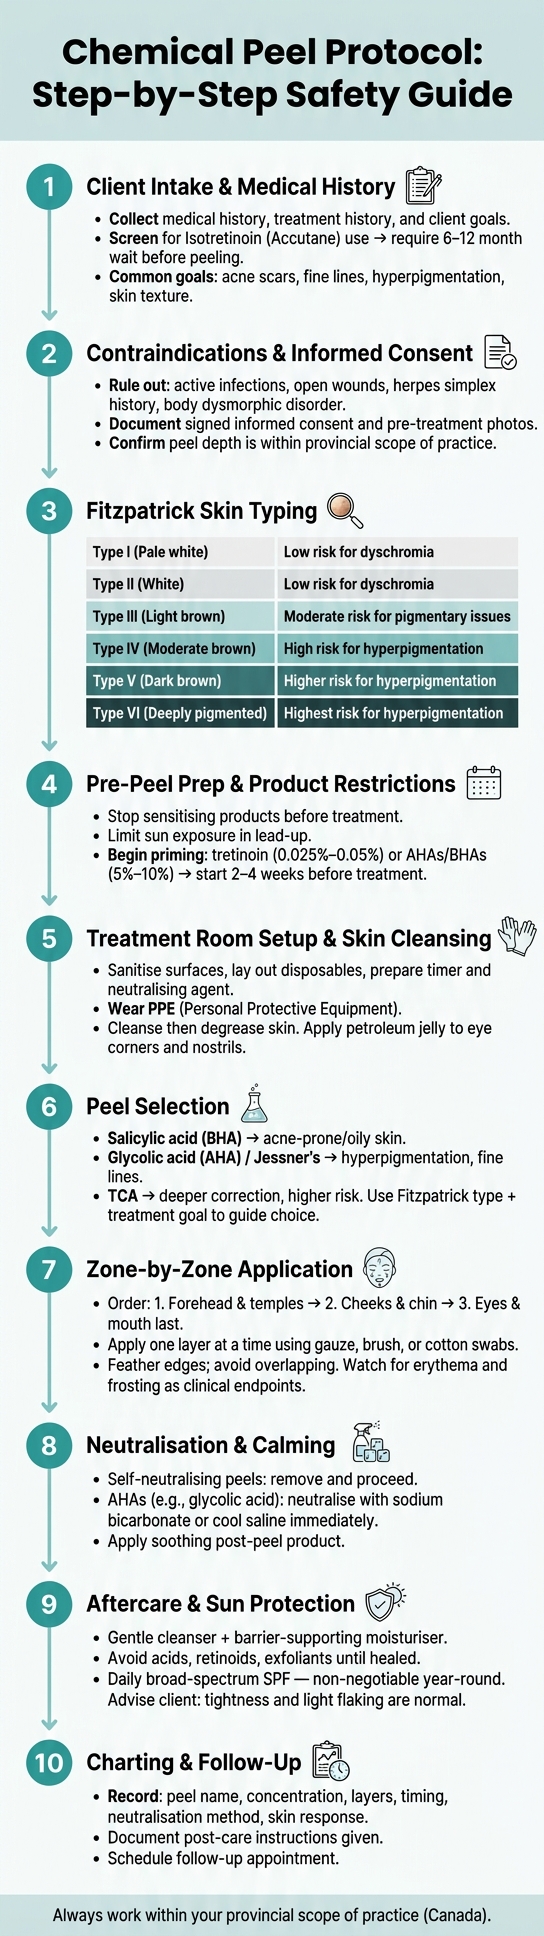
Chemical Peel Protocol: Step-by-Step Safety Guide
12 Step Chemical Skin Peel | Step By Step Procedure Performance Tutorial | Level 4 VTCT Accredited

sbb-itb-c911f39
Client Intake and Skin Assessment
Don’t select, mix, or apply a peel until intake is done. This is your first safety check, and it sets the tone for everything that follows.
Medical History, Treatment History, and Client Goals
The intake form should cover current medications, recent skincare use, past treatments, and the client’s main goals. One of the biggest screening questions is whether the client has taken Isotretinoin (Accutane). This drug affects how the skin heals, and a wait of 6 to 12 months after finishing it is commonly required before doing chemical peels.
You also need a clear record of what the client wants to treat. Common goals include:
- reducing acne scars
- softening fine lines and wrinkles
- treating hyperpigmentation
- improving skin texture
Those goals matter because they shape which peel agent you’ll look at later, along with how deep the treatment should go.
Contraindications, Precautions, and Informed Consent
Check for any active viral, bacterial, or fungal infection, along with open wounds in the treatment area. If a client has a history of herpes simplex, flag it. A peel can trigger an outbreak. Body dysmorphic disorder is also a contraindication for chemical peels.
Make sure informed consent is documented. Go over the healing process, expected results, and possible risks, then take pre-treatment photos.
Keep peel depth within your provincial scope of practice.
Fitzpatrick Skin Typing and Baseline Skin Notes
Use Fitzpatrick skin type to help guide peel choice, strength, and layering. Clients with Fitzpatrick types III through VI have a higher chance of post-inflammatory hyperpigmentation or dyschromia. That means you need to be more careful with agent selection and, in many cases, use a pre-peel priming plan.
| Fitzpatrick Type | Sun Reaction | Peel Risk Level |
|---|---|---|
| I | Always burns, never tans | Low risk for dyschromia |
| II | Burns easily, tans with difficulty | Low risk for dyschromia |
| III | Sometimes mild burn, tans gradually | Moderate risk for pigmentary issues |
| IV | Rarely burns, tans easily | High risk for hyperpigmentation |
| V | Seldom burns, tans very easily | High risk for hyperpigmentation |
| VI | Never burns, tans effortlessly | Highest risk for aberrant pigmentation |
Along with Fitzpatrick typing, record baseline notes on visible sensitivity and where the client’s main concerns appear, such as acne, melasma, facial melanoses, or stretchmarks. If the client shows signs of photoaging, the Glogau Classification (Types I through IV) can help document wrinkle severity and guide peel depth selection.
These notes shape both pre-peel prep and peel selection. Once intake is done, you can move into skin prep and treatment planning.
Skin Prep and Treatment Planning
Use the intake findings to decide skin prep, peel strength, and clear treatment limits before you begin. This step shapes the prep plan, peel choice, number of layers, and exposure time.
Pre-Peel Prep and Product Restrictions
Give clients clear pre-treatment instructions before their appointment. That includes stopping sensitising products and staying out of excess sun exposure in the lead-up to treatment. Good priming helps the peel penetrate more evenly.
For priming, start tretinoin (0.025%–0.05%) or low-strength AHAs/BHAs (5%–10%) 2 to 4 weeks before treatment. This helps soften the outer layer of skin and supports even penetration.
If the skin looks irritated or has had too much sun, postpone treatment and reset the plan.
Cleansing, Degreasing, and Treatment Room Setup
Before the client arrives, sanitise all surfaces, lay out disposables, and have the timer, neutralising agent, and post-care products ready. Wear professional PPE before you start.
Cleansing removes makeup and surface debris. Degreasing removes leftover oil, which helps the peel make more even contact with the skin. Apply petroleum jelly to the corners of the eyes and around the nostrils to cut down on pooling.
Peel Selection, Layer Plan, and Depth Control
Use the Fitzpatrick assessment and the treatment goal to choose the peel agent, strength, and layering plan. If the main concern is acne, pigmentation, or texture, let that guide the choice.
- Salicylic acid (BHA) suits acne-prone and oily skin because of its lipophilic properties.
- Glycolic acid (AHA) and Jessner's solution are better for hyperpigmentation and fine lines.
- TCA is kept for deeper correction and comes with more risk.
Depth depends on the agent, its concentration, the number of layers, and how long it stays on the skin. Watch for frosting as the clinical endpoint. Patchy frosting with mild erythema points to a superficial peel. Even white frosting with erythema underneath points to a medium-depth peel.
For Fitzpatrick types III through VI, add a pre- and post-procedure hydroquinone (2%–4%) plan when needed.
That plan then guides the application order, timing, and number of layers in the next step.
Peel Application Protocol
Once you've set the peel strength and layer plan, apply the solution zone by zone.
Application Order by Facial Zone
Begin with the forehead and temples, then move to the cheeks and chin. Leave the eyes and mouth for last. Before you start, protect the eyes, nostrils, and lips. Then apply the peel in an even layer using gauze, a brush, or cotton-tipped swabs. For liquid peels, gauze gives you better control over coverage.
Keep each pass even. Don't overlap, and feather the edges of the treatment zone so the line between treated and untreated skin is less obvious.
From there, add layers slowly and stop at the first clear endpoint.
Layers, Timing, and Skin Response Monitoring
Apply one layer at a time, then reassess before adding another. Follow the manufacturer's timing and the client's skin response instead of relying on a set schedule. Watch for erythema and frosting as your endpoint. If the client falls into a higher-risk group based on the earlier skin-type assessment, keep layer counts on the cautious side.
If the peel calls for neutralisation, do it right away and move straight into calming care.
Neutralising and Immediate Calming Steps
Some peels are self-neutralising. Others, including many AHAs, need a specific neutralising agent to stop the chemical reaction. For glycolic acid peels, keep sodium bicarbonate or cool saline on hand. After neutralising or removing the peel, reassess the skin, apply a soothing post-peel product, and document the layers, timing, and skin response.
Post-Care, Record Keeping, and Follow-Up
Home Care, Healing Timeline, and Sun Protection
After the peel, clients need clear, plain-language instructions. Advise them to cleanse with a gentle, non-irritating cleanser and use a gentle barrier-supporting moisturiser to help the skin barrier recover during healing. They should avoid acids, retinoids, and exfoliants until healing is complete.
Some tightness and light flaking in the days after treatment are normal. That part can look a bit dramatic, but it doesn't always mean something is wrong. Clients should report redness that doesn't settle or any reaction that gets worse.
Daily broad-spectrum SPF is non-negotiable all year. Review these instructions with the client before discharge, then document them in the chart.
Treatment Records and Charting Details
After you've gone over aftercare, complete the treatment record before the client leaves. Note the start and end times, peel name, concentration, layer count, neutralisation method, and the skin's immediate response.
| Documentation Category | Key Details to Record |
|---|---|
| Pre-Treatment | Client consultation, Fitzpatrick type, contraindications, signed consent |
| Treatment Details | Peel type/agent, concentration, number of layers, application timing |
| Safety & Removal | Neutralisation method, infection-control steps used, safety precautions |
| Clinical Response | Immediate skin reaction, client feedback, immediate calming steps |
| Follow-Up | Post-care instructions provided, expected recovery timeline, scheduled follow-up |
Use the same chart to shape follow-up and future peel planning. It keeps the next visit grounded in what actually happened, not guesswork.
Key Takeaways for Canadian Skincare Practices
A good peel protocol doesn't need to be fancy. Assess the client, prep the skin, apply layers with care, neutralise the peel the right way, chart everything, and follow up.
FAQs
How do I know which peel depth is safest?
The safest peel depth starts with a careful client consultation. That means looking closely at the skin, carrying out a full analysis, and using Fitzpatrick skin typing to guide your decision. You also need to check for skin conditions, spot any contraindications, and make sure the client is a good candidate before you choose a formulation.
Training also explains how different peeling agents work and when to use each one. The goal is to match the peel to the client’s skin type, concerns, and goals, then follow clinical endpoints and protocol guidelines during application. That helps lower the risk of side effects and gives you a clear plan for handling complications if they come up.
When should a chemical peel be postponed?
A chemical peel should be postponed if the client consultation shows contraindications or anything else that could affect safety or the final result.
Professionals should carry out a thorough assessment to confirm the client is suitable for treatment and to check for risk. If the client does not meet the safety criteria set during the consultation, the treatment should be delayed.
What should clients avoid after a peel?
After a chemical peel, clients should stay out of prolonged sun exposure and pause any other exfoliating products until the skin has fully settled and returned to normal.
They should also wear physical SPF protection, follow all post-care instructions given during their session, and report any unexpected skin responses right away.