

If you only remember four things, make it these: clean first, use a Health Canada disinfectant with a DIN, keep surfaces wet for the full label time, and throw out every dermaplaning blade after one use.
I’d sum up the whole process like this: between clients, I clean and disinfect the bed, vinyl, rails, controls, trays, lamp arms, knobs, switches, cart handles, and reusable tools. For most non-critical items that touch intact skin only, low-level disinfection is used after cleaning. And if a label says 3 minutes, the surface needs to stay visibly wet for that full 3-minute period.
Here’s the short version:
- Clean before disinfecting so oils, skin cells, and product film don’t block the chemical.
- Check the DIN and label for surface fit, contact time, rinsing steps, and PPE.
- Treat high-touch spots every time: bed controls, tray handles, lamp switches, door handles.
- Reprocess reusable tools separately: wash, inspect, disinfect, dry, then store on the clean side.
- Discard blades right away into an approved sharps container. Never reuse them.
- Use logs and checklists so each turnover is done the same way, every client, every day.
| Item | What I do | Key rule |
|---|---|---|
| Bed, rails, controls | Clean, then disinfect | Keep wet for label time |
| Trays, lamps, handles, switches | Clean, then disinfect | Hit all high-touch points |
| Reusable handles, tweezers, bowls, brushes | Wash, then disinfect | Dry before storage |
| Single-use blades | Discard after use | Sharps container only |
Bottom line: if you want a treatment room that is safe and consistent on July 15, 2026 and every day after, the job is simple - follow the label, watch the timer, and don’t skip steps.
How to Choose Approved Disinfectants and Check Contact Times
Start with the label. Use a Health Canada-registered disinfectant with the right DIN for the surface you're treating, and follow the label for dilution, wet contact time, rinsing, and PPE. If the product doesn't carry the right identifier for that surface and that use, it doesn't belong in your treatment room.
After cleaning, match the disinfectant to the surface and keep that surface visibly wet for the full label time. That part matters. If it dries early, the product hasn't been used as directed.
Match Your Disinfectant to Beds, Trays, Lamps, and Handles
Not every disinfectant is safe for every surface. Vinyl upholstery, coated metal, plastic, and painted lamp finishes can all react in different ways after repeat chemical use. A product that works well on a stainless steel tray might not be suitable for the vinyl on your treatment bed or the painted coating on a lamp.
For hard, non-porous surfaces such as stainless steel trays, lamp arms, and cart handles, AHP products fit many hard, non-porous surfaces and often have a 3-minute contact time. If you want to use one disinfectant across more than one surface type, check that the label clearly names each surface.
Use one product only where the label names that surface.
| Surface Type | Label Requirement | Key Label Check |
|---|---|---|
| Vinyl treatment beds | DIN-registered product labelled for vinyl upholstery | Confirm vinyl compatibility; avoid harsh bleach |
| Stainless steel trays | DIN-registered product labelled for hard, non-porous metal | Check for corrosion warnings on metal |
| Lamp arms and painted finishes | DIN-registered product labelled for coated surfaces | Confirm no discolouration risk on coated surfaces |
| Cart handles and plastic knobs | DIN-registered product labelled for hard, non-porous plastic | Confirm hard, non-porous surface rating |
How to Build a Timer-Based Contact Time Workflow
Contact time is the period a surface must stay visibly wet to meet the label claim. In busy treatment rooms, the most common mistake is simple: someone wipes too soon. The surface looks done, but the label time hasn't passed.
A small fix can help a lot. Post the contact time on a card at the disinfection station so staff don't need to grab the bottle and hunt for directions during turnover. Then use a room clock or digital timer. Start it the second the product goes on, and don't put the surface back into use until the full time has passed.
This matters most on high-touch spots like:
- bed rails
- tray handles
- lamp controls
These are the areas where rushed turnover tends to cut the disinfection step short.
Public Health Ontario notes that achieving label contact time can be "difficult to attain using a disinfectant wipe", because wipes may not keep the surface wet long enough, especially when contact times are 10 minutes.
Safe Chemical Use in the Treatment Room
Once contact time is complete, finish the job with safe handling and storage. Treat disinfectants as WHMIS 2015 workplace chemicals. Keep the Safety Data Sheet (SDS) on file for every product, and make sure staff know how to read and follow the label.
Use the PPE listed on the label, including gloves and eye protection when required. Keep the room ventilated during and after use. Never mix products. Bleach combined with other cleaners can create dangerous fumes, and you should never go past the labelled dilution.
Store disinfectants in their original containers, or in properly labelled secondary containers. Keep them away from heat, and replace any bottle that's damaged or missing its label.
sbb-itb-c911f39
Between-Client Cleaning and Disinfection: Step by Step
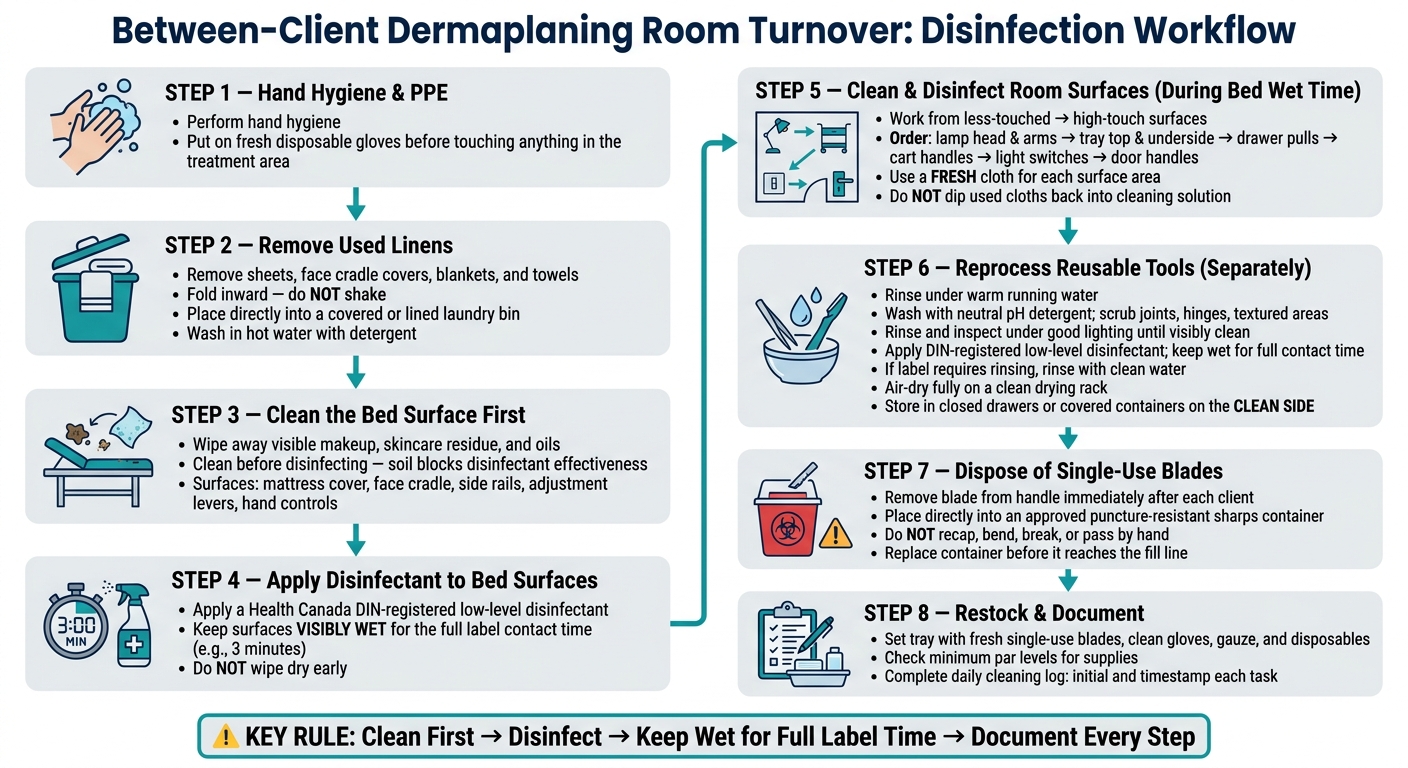
Dermaplaning Room Turnover: Step-by-Step Disinfection Workflow
Between-client turnover means cleaning and disinfecting every touched surface in a set order, so contamination doesn't get spread around the room.
Treatment Beds: Linens, Vinyl, Rails, and Controls
Start with hand hygiene. Then put on fresh disposable gloves before you touch anything in the treatment area.
Remove all used linens - sheets, face cradle covers, blankets, and towels - with as little shaking as possible. Place them straight into a covered or lined laundry bin. That part matters. Shaking linens can send microorganisms into the air and onto nearby surfaces, so fold them inward and drop them directly into the bin. Wash them in hot water with detergent.
After the linens are gone, clean the bed surface first. Wipe away visible makeup, skincare residue, and oils before you apply disinfectant. If soil stays on the surface, the disinfectant won't work as well. So this step isn't optional.
Once the surface is clean, apply a low-level disinfectant meant for environmental surfaces to the mattress cover, face cradle, side rails, adjustment levers, and hand controls. Then keep those surfaces wet for the full label time. While the bed stays wet, move on to the other high-touch areas in the room.
Trays, Lamps, Knobs, Switches, and Cart Handles
While the bed is disinfecting, use that wet time well and clean the rest of the room.
Work from less-touched surfaces to high-touch points. Start with the lamp head and lamp arms. Then move to the tray top and underside, drawer pulls, cart handles, and finish with light switches and nearby door handles.
Why does that order matter? Because if you touch a light switch with a glove that just wiped the tray, you can put contamination right back onto a surface you either haven't cleaned yet or just finished.
Use a fresh cloth for each surface area. And don't dip used cloths back into your cleaning solution. Tray undersides, lamp bases, knobs, and door handles all need to be part of every turnover pass, not only when they look dirty.
Daily and End-of-Day Deep Cleaning Points
Between-client turnover covers the surfaces tied directly to the service. End-of-day cleaning covers the spots that often get missed during that pass: bed legs and undersides, electrical cords, wall switches and outlet plates, storage handles, and the bases of rolling carts.
A written daily checklist is one of the best ways to keep this steady, especially in clinics where more than one practitioner uses the same room. End-of-day cleaning is also the right time to inspect vinyl surfaces and cords for wear or cracking. That helps catch damage early and cut safety risks along with infection risks.
| Cleaning Phase | Surfaces Covered |
|---|---|
| Between-client turnover | Bed surface, face cradle, rails, controls, tray top and underside, lamp head and lamp arms, knobs, switches, handles, door handles |
| Daily/end-of-day deep clean | Bed legs and undersides, cords, wall switches, outlet plates, storage handles, cart bases |
Reusable tools need a separate reprocessing pass after room surfaces are reset.
How to Reprocess Non-Critical Dermaplaning Tools
Once the bed, trays, and high-touch areas are disinfected, move on to reusable tools. Reprocess reusable non-critical tools separately after the room surfaces are done. These tools touch intact skin only, such as metal handles, stainless steel bowls, spatulas, tweezers, and reusable brushes. The rule is simple: clean first, then disinfect. If any tool touches non-intact skin or mucous membranes, switch to the higher intermediate-level disinfection standard.
Handles, Bowls, Spatulas, Tweezers, and Brushes
Start by rinsing each tool under warm running water. Wash it with a neutral pH detergent, then scrub joints, hinges, and textured areas where debris can hide. Rinse well and inspect the tool under good lighting until it is visibly clean.
For hard, non-porous tools, use a DIN-registered low-level disinfectant that is labelled for hard, non-porous tools. Keep the surface wet for the full contact time listed on the label. Some non-critical sprays or wipes call for a 3-minute wet contact time. If tweezers or another tool touches broken skin, use an intermediate-level disinfectant labelled for that use. If the label says the tool must be rinsed after disinfection, use clean water and let it dry fully before storage.
Single-Use Blades and Sharps Disposal
Dermaplaning blades are single use only. Never clean them, disinfect them, or use them again. After each client, remove the blade from the handle and place it straight into an approved puncture-resistant sharps container. Do not recap it, bend it, break it, or pass it by hand. Swap out the container before it reaches the fill line.
Drying, Storage, and Clean-Side Setup
After the full contact time is done, dry the tools before putting them away. Set them on a clean drying rack, let them air-dry fully, then store them in closed drawers or covered containers on the clean side. Once the tools are back on the clean side, the room is ready for final restock and checklist completion.
How to Standardize Turnover and Restock Safely
Use Checklists, Logs, and a Surface Reference Table
Once tools are back on the clean side, reset the room with a written turnover system. Keep the process in writing, assign each step by role, and label tasks by timing: between clients, daily, or end of day.
Post the table at the disinfection station so staff can check each surface at a glance.
| Surface or Tool | Cleaning Step | Disinfectant Type | Contact Time | Frequency |
|---|---|---|---|---|
| Bed vinyl, rails, and controls | Clean, then disinfect | Low-level disinfectant with a Health Canada DIN | Per label | Between every client |
| Instrument tray | Clean, then disinfect | Low-level disinfectant with a Health Canada DIN | Per label | Between every client |
| Lamp arm and knobs | Clean, then disinfect | Low-level disinfectant with a Health Canada DIN | Per label | Between every client |
| Cart handles and switches | Clean, then disinfect | Low-level disinfectant with a Health Canada DIN | Per label | Between every client |
| Dermaplaning handle, tweezers, bowls, brushes | Clean, then disinfect | Low-level disinfectant with a Health Canada DIN | Per label | After each use |
Use that table alongside a daily cleaning log. Staff should initial and add a time stamp for each completed task. Keep one line per client for the bed, tray, lamp, and tools.
Restock Professional Supplies for Reliable Turnover
Add restocking to the room-reset checklist. After tools are dry and stored on the clean side, check that the tray is set with fresh single-use blades, clean gloves, gauze, and any other disposables needed for the next client. Set minimum par levels based on daily booking volume so supplies don’t run short.
Conclusion: The Non-Negotiables for Safer Dermaplaning Rooms
Clean first. Always remove visible soil before applying disinfectant. Use only Health Canada-approved disinfectants with a DIN, and match the product to the surface type. Keep surfaces visibly wet for the full contact time on the label. Don’t wipe them dry early.
Between every client, disinfect all high-touch surfaces, including bed surfaces and rails, trays, lamp arms, cart handles, and reusable tools. Discard every dermaplaning blade right after use into an approved sharps container. No exceptions. Store reprocessed tools only on the clean side, in closed, labelled storage. Document each step in checklists and logs so the work can be tracked and reviewed.
That kind of steady routine keeps turnover fast, traceable, and safe.
FAQs
What if a surface dries too fast?
A surface needs to stay visibly wet for the full contact time listed by the manufacturer to disinfect as intended. If it dries too soon, the dwell time was not met.
Apply the disinfectant again right away so the surface stays wet for the full period, such as 3 minutes for PREempt RTU solutions or wipes. Keep an eye on the surface the whole time.
When do I need intermediate-level disinfection?
Intermediate-level disinfection is required for non-critical tools and environmental surfaces that touch skin or may be exposed to body fluids during dermaplaning services.
Use low-level disinfectants for routine cleaning of treatment tables and chairs. Use intermediate-level disinfection on non-porous surfaces when you need broader microorganism control. Always follow Health Canada-approved disinfectant protocols to stay compliant and keep the space sterile.
How should I store clean tools after drying?
Store clean, dry tools in a clean, dry space. Use non-porous, moisture-resistant storage like plastic bins or stainless steel shelving. Don’t keep items on the floor, under sinks, or on window sills.
Store sterile packaged blades in closed cupboards or on shelves. If you use open shelving, keep items at least 25 cm off the floor, 46 cm from the ceiling, and 5 cm from exterior walls.