
Organizing your dermaplaning treatment room is key to creating a safe, efficient, and professional environment. Clients form impressions of your space within seconds, so maintaining cleanliness and proper tool storage is non-negotiable. Here's a quick rundown of what you need to know:
- Inventory Management: Regularly review supplies, discard expired items, and track stock levels for tools, blades, and consumables.
- Storage Setup: Use durable, non-porous containers and follow hygiene standards like keeping shelves at least 25 cm above the floor.
- Room Layout: Position tools and equipment for easy access, with clean and soiled areas clearly separated.
- Daily Maintenance: Clean surfaces, restock essentials, and sterilize tools after each use.
- Reliable Suppliers: Source high-quality tools and supplies to maintain safety and performance.
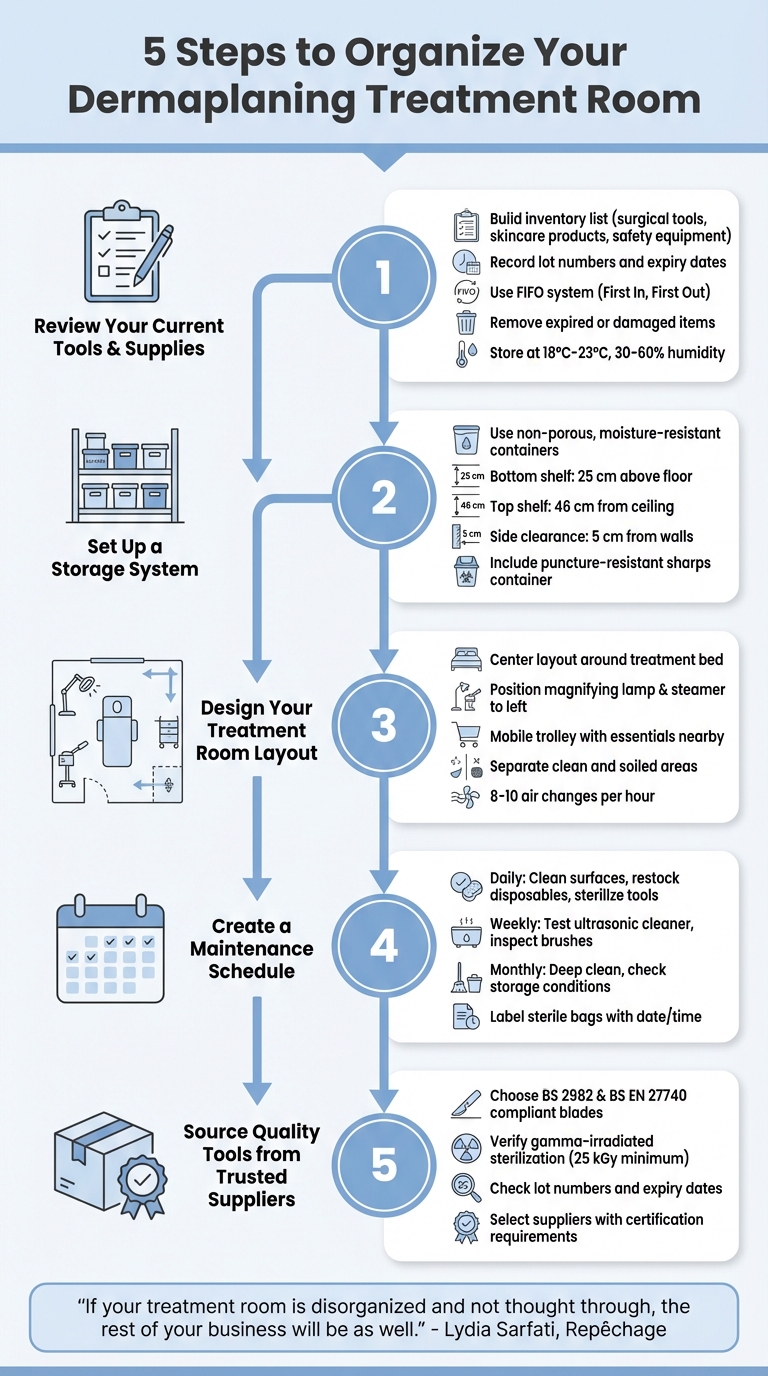
5-Step Guide to Organizing Dermaplaning Treatment Rooms
Step 1: Review Your Current Dermaplaning Tools and Supplies
Keeping your treatment room organized and hygienic starts with a thorough inventory review. This process helps you stay prepared, avoid clutter, and remove anything that’s no longer safe or effective. A well-maintained inventory sets the stage for smooth and professional treatments.
Build an Inventory List
To make tracking easier, organize your supplies into categories like surgical tools (e.g., blades and handles), skincare products (cleansers, peels, masks), and safety equipment (such as gloves, eye protection, and sharps containers).
Pay close attention to traceability details. As highlighted by Hale Cosmeceuticals Inc, “Boxes of surgical blades are marked with lot numbers and expiry dates for traceability”. Record this information for all sterile products - it’s crucial for both safety and compliance. Also, ensure that your blade sizes, like #10R for smaller areas or #14 for full-face treatments, are compatible with their respective handles, such as No. 3, No. 7, or B3.
For consumable items like gloves, cotton pads, and blade removal units, consider using a spreadsheet or digital alerts to monitor stock levels. Implement a "first in, first out" (FIFO) system to ensure older supplies are used before newer ones.
Once your inventory list is complete, inspect every item carefully to confirm it’s in good condition and hasn’t expired.
Remove Expired or Damaged Items
Examine each sterile blade package for signs of damage, such as punctures, moisture, or crushing. If you find any issues, discard or re-sterilize the affected items. Proper storage is just as important - keep sterile tools in an environment between 18°C and 23°C, with relative humidity levels of 30% to 60%, to prevent premature wear.
Used blades should go straight into approved sharps containers. For reusable tools, check for rust, pitting, or chemical damage, as overexposure to disinfectants (beyond 15 minutes) can harm metal instruments. Don’t forget to replace worn-out cleaning brushes as part of your routine maintenance. These practices not only help you maintain a safe workspace but also ensure your treatments stay professional and reliable.
Step 2: Set Up a Storage System
Once you've reviewed your inventory, the next step is creating a storage system that ensures sterility while making your workflow more efficient. A well-thought-out setup not only protects your dermaplaning tools from contamination but also keeps them easily accessible during treatments.
Choose Clean and Durable Storage Options
Opt for containers and shelving that are non-porous and resistant to moisture, as these can handle frequent disinfection without deteriorating. According to Public Health Ontario, "containers used for storage of clean equipment/devices should be moisture-resistant and cleanable (i.e., cardboard boxes must not be used)". Plastic bins or totes are great for organizing smaller items, while stainless steel shelving offers a sturdy and easy-to-clean option for larger equipment.
For open shelving, follow these guidelines for proper placement:
- Keep the bottom shelf at least 25 cm above the floor.
- Maintain a distance of at least 46 cm from the ceiling.
- Ensure a 5 cm clearance from exterior walls.
Additionally, solid top and bottom shelves help protect supplies from dust and debris. For sterile items like packaged blades, store them in closed shelves or cupboards. Avoid placing these items on the floor, under sinks, or on window sills, as moisture can compromise their sterility.
Make sure to include a puncture-resistant sharps container with a secure lid for used blades. A blade removal unit (BRU) capable of holding up to 100 used blades is a practical addition, especially during busy shifts, as it eliminates the need to manually handle sharps.
Organize by Frequency of Use
Arranging your tools and supplies by how often you use them can save valuable time. Lydia Sarfati, President and Founder of Repêchage, emphasizes the importance of accessibility, advising that materials should be "easily reachable at their fingertips".
- High-frequency items: Place essentials like sterile blades (e.g., No. 10R and No. 14), handles (No. 3 or No. 7), alcohol prep pads, and cleansers on the top tier of your mobile trolley or workstation. For example, a 200-count box of alcohol prep pads costs about $4.95 CAD.
- Medium-frequency items: Store items like disinfectant wipes (e.g., CaviWipes 2.0, priced at $27.95 CAD for a 160-count container), hand sanitizer, and specialized serums in labelled drawers or on nearby countertops.
- Low-frequency items: Reserve closed cabinets or lower drawers for bulk refills, chemical peels, and extra linens.
This tiered system keeps your workspace organized and clutter-free while ensuring that everything you need is within arm's reach. Once your storage system is in place, you can move on to designing a functional layout for your treatment room.
Step 3: Design Your Treatment Room Layout
Once you've organized your inventory and storage, the next step is to plan a layout that promotes smooth treatments and ensures client safety. The arrangement of your equipment and furniture plays a vital role in how efficiently you work and how comfortable your clients feel during their dermaplaning sessions.
Set Up Your Workstation
Start by centring your layout around the treatment bed, leaving enough room for you and your client to move comfortably. Position key equipment like the magnifying lamp and steamer to your left, ensuring they're within easy reach and ready for use. Keep a mobile trolley nearby, stocked with your dermaplaning essentials - sterile blades, handles, alcohol prep pads, and antiseptics. This setup helps you stay focused on the treatment without needing to step away or disrupt the session. Secondary items, like a hot towel cabinet, can be placed on a counter behind you for easy access without cluttering your immediate workspace.
A sharps container and blade removal unit (BRU) should be on your workstation, allowing for the safe disposal of used blades. To maintain the sterile field, place a lidded, foot-pedal-operated trash can nearby for waste disposal. For client belongings, provide a non-porous chair or a plastic basket on the right side of the room, keeping personal items off the floor and away from your work area.
For added client comfort, ensure the ceiling has a clean and calming appearance. With your workstation efficiently arranged, focus on maintaining a clean and professional treatment space.
Keep Your Space Clean and Professional
First impressions matter - studies show that clients form opinions about a professional space within seconds. A cluttered or untidy room can quickly erode their confidence.
"The correct set up of a treatment room is an indication of your professionalism and dedication to your client's comfort." - Lydia Sarfati, President and Founder, Repêchage
Avoid unnecessary decorative items that can collect dust or harbour bacteria. Work surfaces should be smooth, non-porous, and easy to disinfect. Stainless steel is an excellent choice as it withstands frequent cleaning without wear. Opt for hard flooring like wood instead of carpet, as it’s easier to sanitize.
Keep clean and soiled areas separate to prevent cross-contamination. Dedicate one counter for used tools and another for sterile supplies. If your room lacks windows, consider using a HEPA air purifier to reduce airborne particles and neutralize disinfectant odours. Proper air circulation is also essential - areas for decontamination should have at least 8 air changes per hour, while clean zones require 10.
Tidy up electrical cords with cable covers or boxes to prevent tripping hazards and dust accumulation. These small details not only enhance the room's appearance but also reflect your commitment to hygiene and professionalism. With your layout in place, you’re ready to establish a maintenance routine to keep everything running smoothly.
sbb-itb-c911f39
Step 4: Create a Maintenance Schedule
Without a proper maintenance routine, even the most organized spaces can quickly fall into disarray. A consistent schedule ensures your tools remain sterile, your workspace stays professional, and your clients feel confident in your services. Toronto Public Health underscores this by stating, "Cleaning of instruments is very important to ensure disinfectants and the sterilization process works properly". By sticking to a structured plan, you not only protect your investment in high-quality tools but also keep your practice running smoothly. Start by tackling these essential daily cleaning and restocking tasks to lay the groundwork for long-term upkeep.
Daily Cleaning and Restocking Tasks
At the end of each day, dedicate time to thoroughly clean and restock your treatment room. Multi-use instruments should be reprocessed with care: pre-soak them in cool water, scrub while submerged to prevent splashing, rinse with warm water, and dry completely before sterilization. Use a dedicated reprocessing sink separate from your handwashing sink, and ensure it’s located away from toilets. Disinfect all surfaces that come into contact with clients or tools, including treatment tables, bolsters, chairs, stools, and trolleys. Don’t forget high-touch areas like light switches, doorknobs, and counters. If you rely on an ultrasonic cleaner, replace the solution daily - or more often if it becomes visibly dirty - and clean and disinfect the unit at the end of the day.
Keep your space stocked with essential disposables like fresh couch rolls, gloves, hand sanitizer, tissues, and single-use items such as wooden spatulas or eyebrow brushes. Used linens should go into a lidded, lined receptacle, while fresh linens should be stored in a covered, secure container. Empty your lidded, foot-pedal trash cans daily to maintain hygiene.
Diana Muresan from HeyGoldie highlights the importance of sterilization, saying, "People will always feel safe and appreciated when you use sterilized and packaged tools on them and will be most likely to recommend you to others". To stay organized, label sterile bags with the date and time of sterilization, and consider using a scheduling app to set recurring reminders.
Weekly and Monthly Deep Cleaning
In addition to daily routines, periodic deep cleaning is essential to maintain hygiene and protect your equipment. Test your ultrasonic cleaner weekly to ensure it complies with Health Canada or CSA standards - follow the manufacturer’s instructions for accurate results. Regularly inspect cleaning brushes and utility gloves, and replace them as soon as they show signs of wear.
Deep cleaning sessions should cover all surfaces, including floors, baseboards, light fixtures, and door frames. Storage carts and bins should also be cleaned according to your facility’s guidelines. During these sessions, check the integrity of sterile packaging: if you find any tears or dampness, the tools must be re-sterilized before use.
Monthly, evaluate your storage environment to ensure it meets recommended conditions. Maintain temperatures between 18°C and 23°C and relative humidity levels between 30% and 60%. Use moisture-resistant, cleanable containers like plastic totes for storage, and avoid cardboard boxes since they cannot be properly disinfected.
Step 5: Source Quality Dermaplaning Tools from Trusted Suppliers
Having the right tools is crucial for creating an efficient and professional setup. Even with a perfectly organized treatment room, using subpar blades or inconsistent supplies can undermine your efforts. Surgical blades that comply with BS 2982 and BS EN 27740 standards ensure reliable performance and precision. These professional-grade blades come sterile (gamma-irradiated at a minimum dose of 25 kGy) and include lot numbers and expiry dates for proper traceability.
To maintain these high standards, sourcing from reputable distributors is key. Reliable suppliers offer much more than just blades - they provide access to a full range of essentials, such as medical-grade disinfectants (like CaviWipes and PREempt), blade removal boxes, sharps containers (ranging from 0.95 L to 5.1 L), and complementary skincare products. Trusted suppliers also require certifications, ensuring compliance with safety and hygiene regulations. This is where a partner like Dermaplaning Supplies Canada can make a real difference.
Why Choose Dermaplaning Supplies Canada
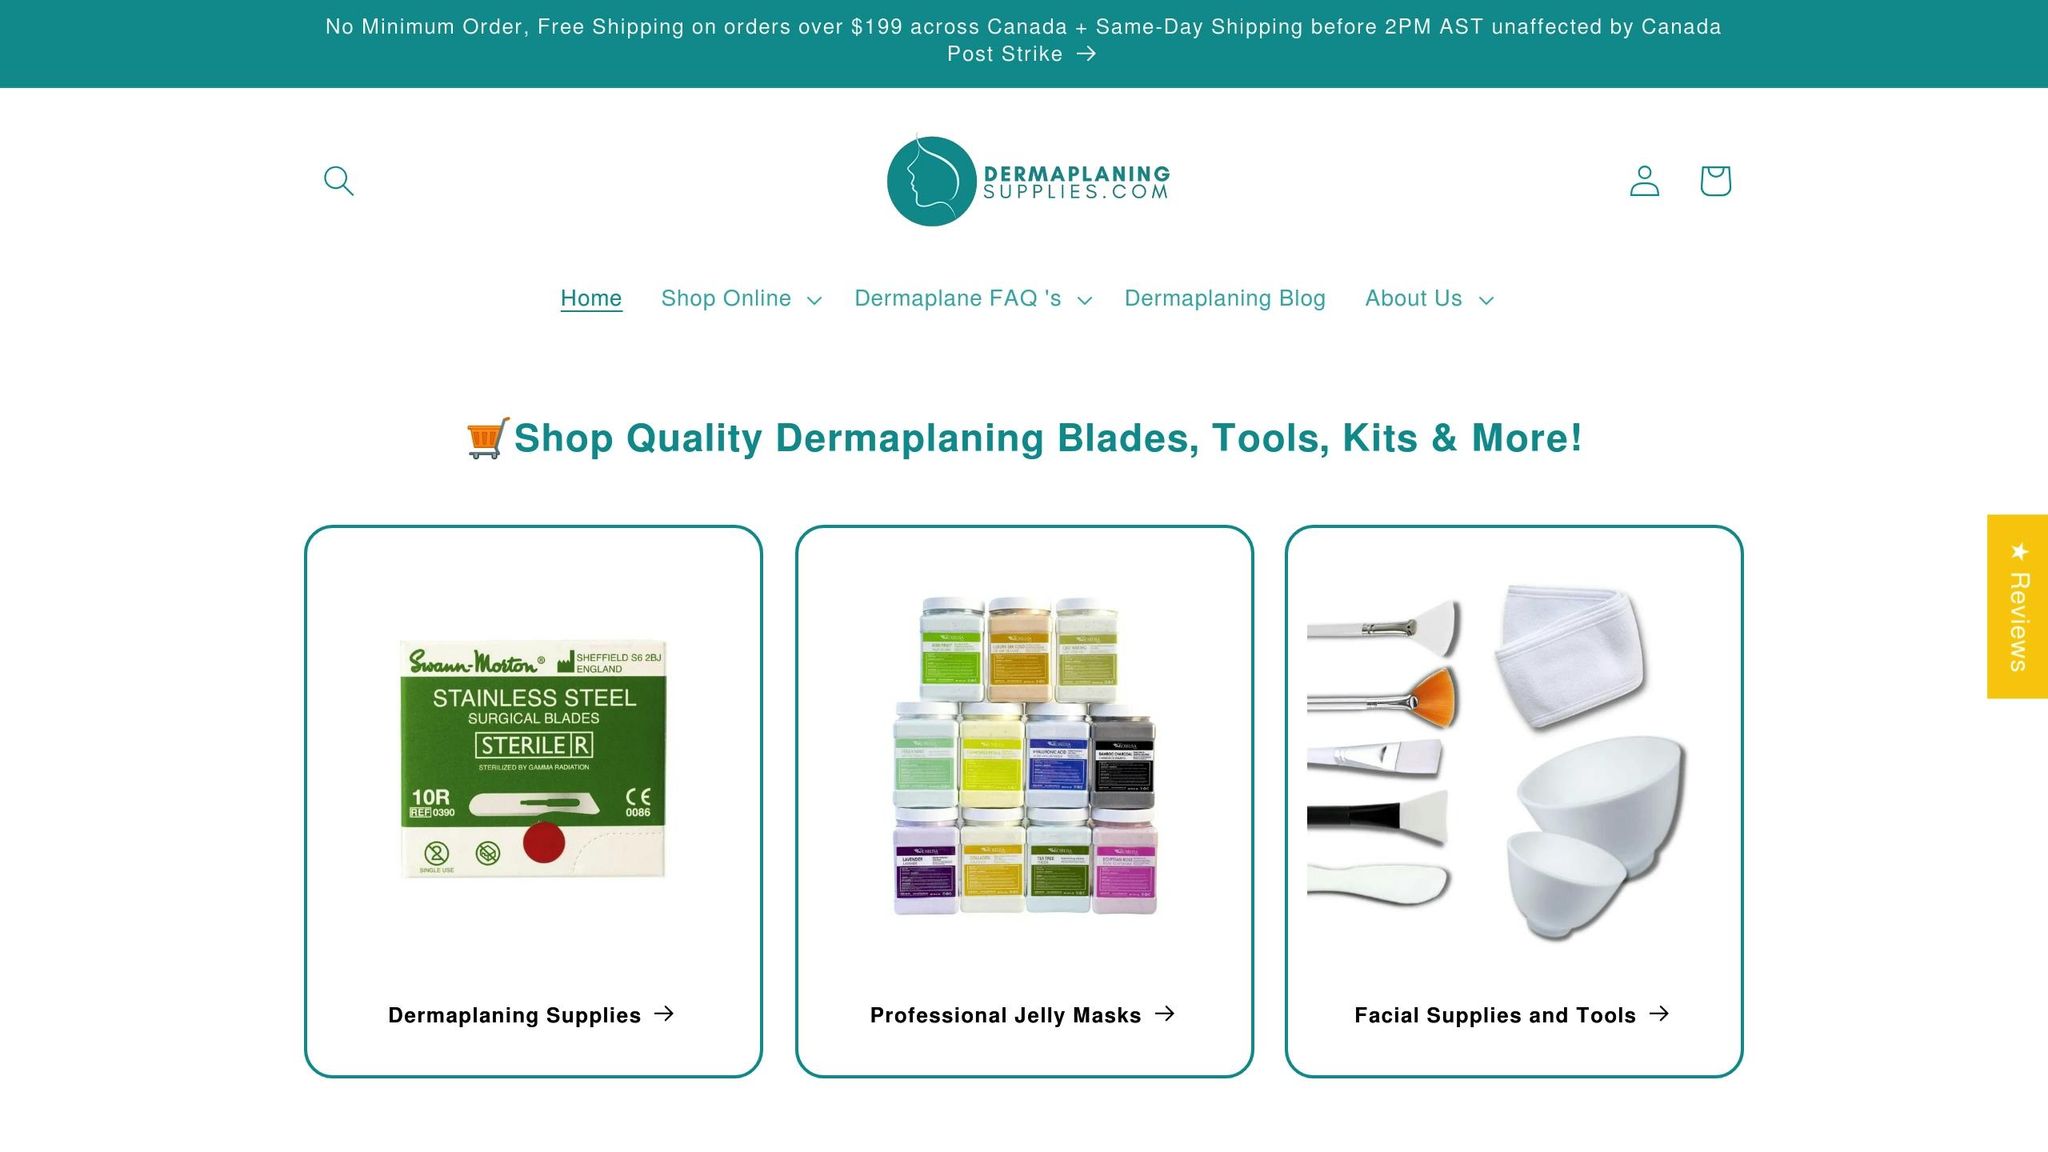
Using high-quality tools not only improves your practice but also reinforces your commitment to safety and hygiene. Dermaplaning Supplies Canada supports medical aestheticians, laser technicians, nurse injectors, and dermatology students across the country. With an impressive 4.8 out of 5-star rating based on 279 reviews, they’ve earned a reputation for dependable service and top-notch products. Their Swann Morton #10R "Butter Blades" boast a perfect 5.0 out of 5 rating from 30 reviews, while their #14 blades are frequently praised for their effectiveness in removing hair and dry skin smoothly and efficiently.
Beyond their product offerings, Dermaplaning Supplies Canada provides valuable educational resources to help grow your practice. These include online certification courses, currently discounted to $199.99 CAD from $399.99 CAD, as well as digital training manuals, treatment protocols, and marketing templates. Their logistics are also designed with convenience in mind - orders placed before 2 PM AST ship the same day, and they offer free shipping on orders over $199 CAD with no minimum purchase required. Customers often highlight their prompt next-business-day delivery and careful packaging.
Their product range includes everything from premium #3 scalpel handles (priced around $14.95 CAD) to budget-friendly versions (approximately $6.95 CAD), professional disinfectants like PREempt RTU Surface Disinfectant ($14.95 CAD per litre), and safety equipment that integrates seamlessly into your workflow. Whether you're just starting out or looking to upgrade, Dermaplaning Supplies Canada has the tools and resources to support your success.
Conclusion
A well-organized treatment room does more than just look good - it enhances workflow, improves client satisfaction, and solidifies your professional reputation. As Lydia Sarfati, President and Founder of Repêchage, wisely notes:
"If your treatment room is disorganized and not thought through, the rest of your business will be as well".
Taking the time to organize your supplies, set up efficient storage, plan a practical layout, and stick to regular cleaning routines can make a world of difference. These small but impactful steps help streamline appointments, reduce stress, and keep your day running smoothly.
Having everything within easy reach and maintaining dedicated spaces for clean linens allows you to reset rooms quickly between clients. This not only saves time but also minimizes physical strain, letting you focus on providing uninterrupted treatments and maximizing your schedule.
First impressions matter. A clean and orderly space sends a clear message about your professionalism, helping to ease client anxiety and build trust. An organized environment ensures treatments run efficiently while reflecting your commitment to client comfort and safety.
Start small - whether it’s creating an inventory list or tidying up your workstation trolley. Even minor adjustments can lead to noticeable improvements. Clients appreciate attention to detail, and these efforts can foster loyalty and long-term relationships. By implementing these practical changes, you’ll not only elevate your treatment efficiency but also reinforce the quality of care you provide.
FAQs
How can I keep my dermaplaning tools clean, sterile, and ready for use?
To keep your dermaplaning tools sterile and safe, start by washing them thoroughly with warm, soapy water, ensuring all residues are removed. Rinse them well, then disinfect using a high-level disinfectant, following the recommended contact time specified by the product. For tools that penetrate the skin, sterilization is essential - use either an autoclave or a CSA-approved dry-heat sterilizer. Once the tools are cleaned and sterilized, store them in a clean, dry, and covered container, maintaining a temperature between 18–23 °C.
For convenience and to meet professional standards, you can find approved cleaning and sterilization products through Dermaplaning Supplies Canada. These steps help ensure your tools stay hygienic and ready for safe use.
What’s the best way to organize dermaplaning tools for a clean and efficient treatment room?
To keep your treatment room running smoothly and hygienically, divide it into three functional zones: clean, dirty/soiled, and prep/stock. In the clean zone, store sterile blades, disposable handles, and skincare supplies in moisture-resistant containers on a dust-free shelf. Make sure the shelf is positioned at least 25 cm off the floor and 46 cm below the ceiling to maintain sterility. Organize items by type or size for quick access, and consider using a lockable cabinet near the treatment chair for added convenience.
Place the treatment chair in a central location, with a height-adjustable surface on one side and a hand-washing station on the other. This setup supports a logical workflow: seat the client, wash your hands, grab a pre-packed dermaplaning kit, perform the procedure, and dispose of used blades safely in a sharps container. Keep the area clutter-free and maintain an ambient temperature between 18 °C and 23 °C, with relative humidity levels between 30% and 60%. These conditions help preserve your tools and create a comfortable environment for your clients.
In the prep zone, stock ready-to-use dermaplaning kits containing sterile blades, disposable handles, and post-treatment serums. Clearly label storage areas using metric measurements and Canadian spelling for a polished and professional setup. This not only saves time but also enhances the overall client experience.
What’s the best way to manage and organize dermaplaning tools and inventory?
To keep your dermaplaning tools and supplies organized, start by separating single-use items (like blades, disposable spatulas, and pre-filled serums) from reusable tools (such as handheld dermaplaners and sterilization trays). Maintain an inventory log that includes details like SKUs, costs in CAD ($), and the expiry or shelf life of each item. Whether you prefer inventory software or a simple spreadsheet, tracking stock levels and setting alerts for low supplies can save you time and prevent last-minute shortages.
When it comes to storage, follow Canadian health standards to ensure cleanliness and safety. Keep all sterile supplies in a dedicated storage area with a temperature range of 18–23 °C and relative humidity between 30–60%. Use non-porous shelving that’s at least 25 cm off the floor and 46 cm below the ceiling. Store items in closed, dust-free bins, and clearly label each bin with the product name, lot number, and expiry date for quick and easy access.
To simplify restocking, consider partnering with a trusted supplier like Dermaplaning Supplies Canada. By linking your purchasing system to your inventory tracker, you can ensure stock levels are updated automatically, keeping your practice well-prepared for every treatment.